Please disable your adblock and script blockers to view this page

Search this blog

Friday, 17 July 2015

Apply sorting to POJO based af:table programmatically , Using custom sort listener in ADF

Again a post about POJO based table , previously i have posted about-

1.Populating and adding records in POJO based table
Populate af:table programmatically from managead bean using POJO
2. Gettting selected rows from POJO based table
Get selected row (single/multiple) from POJO based table in ADF

This post is about applying sorting to POJO based table , when we drop a viewObject as af:table on page then framework provides sorting and filtering features declaratively, but when populating table from managed bean using List(POJO) then it is not there so we have to do it manually

To understand this post completely , go through previous posts and check attached application there
I have used a PersonBean java bean class to contain columns of table or you can say there is a List of PersonBean type that populates data in af:table. (This is the basic information about application)


Now what to do , see step by step implementation-
  • Select table on page editor and create a sortListener in managed bean to handle sortEvent


  • Now what we have do in sort listener ?
    1.Get active sort criteria using sortEvent
    2.Remove that sort criteria
    3.Sort List Data Structure that is used to populate af:table
    4.Apply sort criteria again on af:table

    See code written in managed bean-

  •     //List to store sort criteria
        private List<SortCriterion> sortedTableList = new ArrayList<SortCriterion>();
    
        public void setSortedTableList(List<SortCriterion> sortedTableList) {
            this.sortedTableList = sortedTableList;
        }
    
        public List<SortCriterion> getSortedTableList() {
            return sortedTableList;
        }
    
        /**Custom Sort Listener for POJO based af:table
         * @param sortEvent
         */
        public void tableSortListener(SortEvent sortEvent) {
            //Get active sortCriteria on table
            List<SortCriterion> activeSortCriteria = sortEvent.getSortCriteria();
            SortCriterion sc = activeSortCriteria.get(0);
            // Remove active criteria from table
            this.removeSortCriteria(sc);
            //Sort List that populates table using Comparator interface
            applySortAsPerColumn(sc.getProperty());
    
            // Add the current criteria to the list
            this.sortedTableList.add(0, sc);
            // Apply sort criteria to table
            RichTable richTable = (RichTable) sortEvent.getComponent();
            richTable.setSortCriteria(sortedTableList);
    
        }
    
        /**Removes sort criteria*/
        private boolean removeSortCriteria(SortCriterion sortCriterion) {
            //Checks that if any sortCirteria is present in list , if yes then remove it
            if (sortedTableList != null && sortedTableList.size() > 0) {
                for (SortCriterion sc : sortedTableList) {
                    if (sc.getProperty().equals(sc.getProperty())) {
                        sortedTableList.remove(sc);
                        return true;
                    }
                }
            }
            return false;
        }
    

    Now logic to apply programmatic sort starts from here , we have to sort List using Java Comparator interface
    To Read more - How to sort ArrayList using Comparator?     Comparator interface

        private void applySortAsPerColumn(String criteria) {
            //Get List that populates table
            List<PersonBean> list = getPersonList();
            //Check which column's sorting is triggered from UI
            //and then sort list on basis of that attribute
            //Sorting of collection makes use of Comparator interface, Read about it
            if ("name".equalsIgnoreCase(criteria)) {
                Collections.sort(list, new ProgTableBean.PersName());
            } else if ("mobNo".equalsIgnoreCase(criteria)) {
                Collections.sort(list, new ProgTableBean.MobNo());
            } else if ("salary".equalsIgnoreCase(criteria)) {
                Collections.sort(list, new ProgTableBean.Salary());
            }
        }
        // Comparator for all attributes to sort List according to different attributes
    
        public static class PersName implements Comparator<PersonBean> {
            private int flag = 1;
    
            @Override
            public int compare(PersonBean o1, PersonBean o2) {
                return flag * o1.getName().compareTo(o2.getName());
            }
        }
    
    
        public static class MobNo implements Comparator<PersonBean> {
            private int flag = 1;
    
            @Override
            public int compare(PersonBean o1, PersonBean o2) {
                System.out.println("In 2**");
                return flag * o1.getMobNo().compareTo(o2.getMobNo());
    
            }
        }
    
    
        public static class Salary implements Comparator<PersonBean> {
            private int flag = 1;
    
            @Override
            public int compare(PersonBean o1, PersonBean o2) {
                return flag * o1.getSalary().compareTo(o2.getSalary());
            }
        }


  • Now on page ,select table and set sortable true for each column and set sortProperty same as column name
    Check af:table source after setting all properties

  • <af:table var="row" rowBandingInterval="1" id="t1" value="#{viewScope.ProgTableBean.personList}"
                              partialTriggers="::b1" rowSelection="multiple" binding="#{viewScope.ProgTableBean.tableBind}"
                              selectionListener="#{viewScope.ProgTableBean.tableSelection}"
                              sortListener="#{viewScope.ProgTableBean.tableSortListener}">
                        <af:column sortable="true" headerText="Name" id="c1" width="150" sortProperty="name">
                            <af:outputText value="#{row.name}" id="ot1"/>
                        </af:column>
                        <af:column sortable="true" headerText="Mobile Number" id="c2" sortProperty="mobNo">
                            <af:outputText value="#{row.mobNo}" id="ot2"/>
                        </af:column>
                        <af:column sortable="true" headerText="Salary" id="c3" align="right" sortProperty="salary">
                            <af:outputText value="#{row.salary}" id="ot3"/>
                        </af:column>
                    </af:table>
    

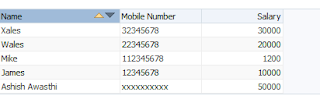
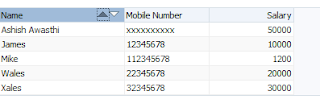
  • All done :) , Run and check application


Sample ADF Application -Download
Cheers :) Happy Learning

Thursday, 16 July 2015

Get selected row (single/multiple) from POJO based table in ADF


Previously i have posted about populating af:table from managed bean using POJO and adding records in it, Check this-
Populate af:table programmatically from managead bean using POJO 
In this post i am extending previous post application
This post is about getting selected row from POJO based table , It is a common requirement while using af:table based on POJO

Get single row using custom selection listener-


SelectionListener  handles selection event of table , whenever user selects a row in table ,selection listener is fired
Set table RowSelection property to single (to select one row at a time) or multiple (to select multiple row ) and create a custom selection listener in managed bean that will handle table's selection event


See selection listener code in managed bean we can get selected row  using this -


import oracle.adf.view.rich.component.rich.data.RichTable;
import org.apache.myfaces.trinidad.event.SelectionEvent;

 /**Method to get selected row(single)
     * @param selectionEvent
     */
    public void tableSelection(SelectionEvent selectionEvent) {
        //Get table from selectionEvent
        RichTable richTable = (RichTable) selectionEvent.getSource();
        //Cast to the List that populates table
        PersonBean row = (PersonBean) richTable.getSelectedRowData();
        //Get the attributes (column) from list
        System.out.println(row.getName());
    }

Now check this -

 Output on console :)

Get single/multiple selected row on a button click (ActionEvent)-


Set table RowSelection to multiple and select multiple row using Ctrl key of your keyboard
and check this code to get multiple selected row using RowKeySet, We can get all row using getSelectedRowKeys method


import org.apache.myfaces.trinidad.model.RowKeySet;
import java.util.Iterator;    


/**Method to get all selected record in af:table
     * @param actionEvent
     */
    public void getSelectedRecord(ActionEvent actionEvent) {
        //getTableBind is binding of table on page.
        RowKeySet selectedEmps = getTableBind().getSelectedRowKeys();
        //Create iterator from RowKeySet
        Iterator selectedEmpIter = selectedEmps.iterator();

        while (selectedEmpIter.hasNext()) {
            String i = selectedEmpIter.next().toString();
            //personList is the list used to populate table and name is a column of table
            //So here filter list using index and get values then
            PersonBean rowIter = personList.get(Integer.parseInt(i));
            System.out.println(rowIter.getName());
        }
       
    }

Now run and check again -

 Output on console :)

Sample ADF Application- Download
Cheers :) Happy Learning

Tuesday, 7 July 2015

Create shortcut of page on a button click in Oracle ADF using JShortcut library (For windows)

This post is about a small trick to create shortcut file from ADF application
Actually this type of requirement doesn't come in picture when you are working in web application , for web application bookmarks replaces desktop shortcut
Still if you want to do this then you can follow approach mentioned in this post

Creating shortcut programmatically requires access of operating system but you need not to worry about that
There is a java library to do this for you - JShortcut
Download jar files from here..

1. Now first step is to create a fusion web application and add this jar to viewController project


2. Create a page (independent runnable like jspx or jsf not fragments) and drop a button in that
3. Create a managed bean to handle button's action
    Here we will make use of JShellLink class of this library

See what docs says about this -

Provide access to shortcuts (shell links) from Java. The native library (jshortcut.dll) is loaded when JShellLink is first loaded. By default, JShellLink first looks for the native library in the PATH, using System.loadLibrary. If the native library is not found in the PATH, JShellLink then looks through each directory in the CLASSPATH (as determined by the value of the system property java.class.path). If an entry in the CLASSPATH is a jar file, then JShellLink looks for the native library in the directory containing that jar file. The application can override this behavior and force JShellLink to look for the native library in a specific directory by setting the system property JSHORTCUT_HOME to point to that directory. This property must be set before the JShellLink class is loaded. This makes it possible to use this library from a self-extracting jar file. 


4. Get the url of current page
 How to get url of current page in ADF Application?
 (See button action listener code for this )
5. Check code written in managed bean-


import javax.faces.context.FacesContext;
import javax.faces.event.ActionEvent;

import javax.servlet.http.HttpServletRequest;

import net.jimmc.jshortcut.JShellLink;

import oracle.adf.controller.ControllerContext;

    JShellLink link;
    String filePath;

    /**Button action listener to create shortcurt of current page on desktop
     * @param actionEvent
     */
    public void createSortcutonDpAction(ActionEvent actionEvent) {
        try {
            //Get url of current ViewPort
            String viewId = ControllerContext.getInstance().getCurrentViewPort().getViewId();
            String viewUrl = ControllerContext.getInstance().getGlobalViewActivityURL(viewId);

            //Get Server Name and Port
            FacesContext fctx = FacesContext.getCurrentInstance();
            HttpServletRequest hsrequest = (HttpServletRequest) fctx.getExternalContext().getRequest();

            String serverName = hsrequest.getServerName();
            int serverPort = hsrequest.getServerPort();

            String runnableUrl = "http://" + serverName + ":" + serverPort + viewUrl;

            //Create Object of shortcurt link
            link = new JShellLink();
            filePath = JShellLink.getDirectory("") + runnableUrl;
            //Set Where you want to create shortcut
            link.setFolder(JShellLink.getDirectory("desktop"));
            //Set shortcut file name
            link.setName("Programmatically Created Shortcut");
            //Use ico file to use as shortcut icon
            link.setIconLocation("C://Users//Admin//Desktop//Jdev_Logo.ico");
            link.setPath(filePath);
            link.save();

        } catch (Exception ex) {
            ex.printStackTrace();
        }

    }

6.  All done :) , run and check application
Click on button and check on desktop


Same code can be used to create shortcut from pure java application
Cheers :) Happy Learning