Please disable your adblock and script blockers to view this page

Search this blog

Showing posts with label better. Show all posts

Thursday, 10 November 2016

Styling Input components inside af:query using ADF Skin


This another post is about af:query skinning, previously I have posted about changing the style of af:query buttons

ADF Skinning : Change color and style of af:query buttons in ADF Faces (Jdev 12.1.3)

Now this post is about styling input components inside af:query, Sometimes we need to change color, width, fonts of inputText, selectOneChoice that are inside af:query and that time simple skin selector doesn't do the job

Saturday, 6 August 2016

ADF UI- Show DVT Chart inside af:table and other collection components


Hello All

This post is about showing a chart inside  ADF Faces Collection component like af:table or af:listView

This is a simple task to create normal chart but in case if we have to show table row record as a chart or graph then we have to change chart value and chart item value references so that it doesn't show all record but only values of that row

This post talks about these two requirements

1. Show same viewObject values as chart in af:table or af:listView
2. Show child viewObject values as chart in af:table or af:listView

Wednesday, 20 July 2016

ADF UI- Using New DVT Component Picto Chart in ADF 12.2.1.1


Hello All

Couple of weeks ago Oracle released new version of ADF & Jdeveloper i.e. 12.2.1.1
This release comes with many new features and data visualization components, one of them is Picto Chart

DVT Component Picto Chart is used to visualize pictorial presentation of Numbers and it uses a count attribute to present chart portion, If you need to show different types of information in picto chart then more than one count attribute can be used

Thursday, 23 June 2016

ADF UI- Using New DVT Component Tag Cloud in ADF 12.2.1.1


In new relaese of Jdeveloper and ADF 12.2.1.1 many new data visualization components are introduced

Here I am talking about <dvt:tagCloud> , this component is used to represent textual data in form of tags. You must have seen tag cloud on many websites to show popular tags or patterns

So now with help of this Tag Cloud component we can create and show same type of UI. In this post I am showing how can we use tag cloud component in our ADF Application

Wednesday, 3 February 2016

ADF UI: Using dvt:sunburst to show hierarchical data in ADF

<dvt:sunburst> is one of fancy components to show multi level hierarchical data in form of circular rings in ADF application

It supports drilling up to n-level , consist of dvt:sunburstNode as it's child tag to show level wise detail . Sunburst supports multiple type of animations that makes a better UI
See What docs says -

Sunbursts are used to display hierarchical data across two dimensions, represented by the size and color of the sunburst nodes. The sunburst displays multiple levels of its hierarchy at once, with each ring corresponding to a level of the hierarchy

Friday, 4 December 2015

New look of dvt:pieChart as donut chart for Data Visualization in ADF 12.2.1.0


Oracle Jdeveloper 12C (12.2.1.0) documentation tells about a new enhancement in look of pie chart

We can now design donut chart using dvt:pieChart , innerRadius property allows us to create donut chart look on the base of default pie chart.
Donut chart is nothing just a variation of pie chart that show data in sections of a circle, I believe everyone knows how to design a pie chart in ADF Faces

Saturday, 21 November 2015

New look of dvt:funnelChart for Data Visualization in ADF 12.2.1.0

A couple of weeks ago Oracle Jdeveloper and ADF team released new version of Jdevloper 12.2.1 with many cool features
New funnel chart (<dvt:funnelChart>) is introduced instead of funnel graph (<dvt:funnelGraph>)
Old funnel graph looks like this-


Funnel chart is used to show visual distribution of different steps of any cycle
What docs says-

A chart representing data related to steps in a process. The steps appear as vertical slices across a cone-shaped section which represent stages of a procees or target and actual values, showing levels by color.

Here we see how to use this new component to design a better UI, For this I have created a viewObject using this sql


SELECT A.DEPARTMENT_NAME, 
B.FIRST_NAME ||' '|| B.LAST_NAME AS EMPLOYEE_NAME,
B.SALARY,
100000 AS TARGET
FROM DEPARTMENTS A, EMPLOYEES B
WHERE A.DEPARTMENT_ID=B.DEPARTMENT_ID;

Then go to datacontrol and drop this viewObject on page as chart

In dialog select Funnel on left panel and you can select horizontal or vertical layout of funnel at right side


This is the configuration screen for Funnel. Here we can select Actual and Target values and Section Name appears on view port


Click on ok button of this dialog and your Funnel chart is ready
See generated XML-


<dvt:funnelChart id="funnelChart2" var="row" value="#{bindings.DeptEmpView11.collectionModel}">
                        <dvt:funnelDataItem id="di2" targetValue="#{row.Target}" label="#{row.DepartmentName}"
                                            value="#{row.Salary}"/>
                    </dvt:funnelChart>

Now run this application and see how it appears :)


Wow.. it's good :)
If we want to show only Departments Name with salary (No comparison with Target) then just remove this targetValue from xml code and then it looks like this


There are lots of properties to change it's layout , 3D effect , Title , FootNote etc. Try each one and see how it affects Funnel

Cheers :) Happy Learning

Saturday, 25 July 2015

ADF Skinning : Change label, content, design and 'Update' button style of af:inputFile

This post is about skinning af:inputFile, see how default inputFile looks on page


See how ADF Skin changes it's appearance :)
Change basic inline style of af:inputFile (background color and design) :

/**Skin Selector to change inline style of af:inputFile**/
af|inputFile {
    background-color: Green;
    border-radius: 20px 20px 20px 20px;
    padding: 5px;
}

Output on page-

Change label style of af:inputFile :


/**Skin Selector to change label style of af:inputFile**/
af|inputFile::label {
  font-weight:bold;
  color:white;
  font-family: cursive;
}

Output on page-


Change content style of af:inputFile (background color, design of content only) :


/**Skin Selector to change content style of af:inputFile**/
af|inputFile::content {
    color: #ff6363;
    font-weight: bold;
    border-color: #79bc79;
    border-style: solid;
    border-width: thin;
    border-radius: 15px 15px 15px 15px;
    padding: 5px;
    background-color: #d6ffd6;
    font-family: cursive;
}


Output on page-

After selecting a file, update button appears -


On click of update button a popup with af:inputFile appears-


Change update button style of af:inputFile:


/**Skin Selector to change style of update button of af:inputFile**/
af|inputFile af|commandButton {
    color: white;
    font-weight: bold;
    background: #00b55a;
    border-radius: 15px 15px 15px 15px;
    font-family: cursive;
}

/**Skin Selector to change style of update button of af:inputFile in case of hover**/
af|inputFile af|commandButton:hover {
    color: white;
    font-weight: bold;
    background: #940000;
    border-radius: 15px 15px 15px 15px;
    font-family: cursive;
}


Output on page-
On hover-
Cheers :) Happy Learning
o

Tuesday, 7 April 2015

Better UI -Show jQuery notification message (for error, warning, info) in Oracle ADF

Hello all,
Another post about using jQuery with ADF Faces , this post is about showing a notification message using jQuery in your ADF Application
Normally we use default FacesMesage to show error, warning and info messages in ADF

here i am using jQuery growl library , you can download files from Growl : jQuery Informative Messages Plugin

Let's see how to integrate this library with ADF Faces, you will get two files from above link
one is JavaScript file (jQuery script) and other one is CSS file (style-sheet for notification UI)


Add both files to viewController project under Web Content

now add reference of both files (JS and CSS) in page and also jQuery library to execute growl script


 <af:resource source="https://ajax.googleapis.com/ajax/libs/jquery/2.0.2/jquery.min.js" type="javascript"/>
            <af:resource source="js/jquery.growl.js" type="javascript"/>
            <af:resource source="style/jquery.growl.css" type="css"/>

Now i have added 3 buttons on page to show different messages on button click and created a managed bean to define action for each button
On button click i have called jQuery script to invoke notification message
see managed bean code-


import javax.faces.context.FacesContext;
import javax.faces.event.ActionEvent;

import org.apache.myfaces.trinidad.render.ExtendedRenderKitService;
import org.apache.myfaces.trinidad.util.Service;

public class ShowJqNotification {
    public ShowJqNotification() {
    }

    /**Helper method to execute javascript
     * @param script
     */
    public void calljqHelper(String script) {
        FacesContext context = FacesContext.getCurrentInstance();
        ExtendedRenderKitService erks = Service.getService(context.getRenderKit(), ExtendedRenderKitService.class);
        erks.addScript(context, script);
    }
    //Change your message as per requirement 
    /**Method to invoke Error Message
     * @param actionEvent
     */
    public void showErrMessageAction(ActionEvent actionEvent) {
        calljqHelper("$.growl.error({ message: \"Hi this is error message!\" });");

    }

    /**Method to invoke Warnign Message
     * @param actionEvent
     */
    public void showWarningMessageAction(ActionEvent actionEvent) {
        calljqHelper("$.growl.warning({ message: \"Hi this is Warning!\" });");
    }

    /**Method to invoke Info Message
     * @param actionEvent
     */
    public void showNoticeMessageAction(ActionEvent actionEvent) {
        calljqHelper("$.growl.notice({ message: \"Hi this is Notice!\" });");
    }

}

All done, now run application and check - how it looks :)


this is default look of script , you can customize it , just change some parameters in both JS and CSS files
I have changed some parameters in both files and see how it looks now

Cheers, Happy Learning :)
Sample ADF Application- Download

Read more about - Jquery and ADF Working together

Image zoom (power zoomer) effect using Jquery in ADF Faces
Show animated Image Caption using jQuery in ADF Faces
Using JQuery in Oracle ADF

Friday, 3 April 2015

Stretch ADF Faces Components to fit browser width (Show as row-column layout- inline block )

Recently i have seen a thread in OTN about layout of components (How to use components to show a particular layout)
ADF layout for showing email recipients

Requirement was simple, user want to show components up to maximum available width (browser window width) first and then move to next line and show other components
So i thought to document it here :)

Suppose i have to show 6 images on page (horizontally) , so for that i have used 6 group layout
one for each image and button


See xml source-

<af:panelGroupLayout id="pgl1" layout="horizontal">
                    <af:panelGroupLayout id="pgl2" layout="vertical" halign="center"
                                         inlineStyle="padding:2px;">
                        <af:image source="#{resource['images:a_hobbit_house-wallpaper-1280x800.jpg']}"
                                  shortDesc="Hobbit House" id="i1" inlineStyle="width:250px;height:200px; "/>
                        <af:button text="View" id="b1"/>
                    </af:panelGroupLayout>
                    <af:panelGroupLayout id="pgl3" layout="vertical" halign="center"
                                         inlineStyle="padding:2px;">
                        <af:image source="#{resource['images:beach_at_sunset_3-wallpaper-1440x900.jpg']}"
                                  shortDesc="Sunset at Beach" id="i2" inlineStyle="width:250px;height:200px; "/>
                        <af:button text="View" id="b2"/>
                    </af:panelGroupLayout>
                    <af:panelGroupLayout id="pgl4" layout="vertical" halign="center" inlineStyle="padding:2px;">
                        <af:image source="#{resource['images:icelands_ring_road-wide.jpg']}" shortDesc="Ring Road"
                                  id="i3" inlineStyle="width:250px;height:200px; "/>
                        <af:button text="View" id="b3"/>
                    </af:panelGroupLayout>
                    <af:panelGroupLayout id="pgl5" layout="vertical" halign="center" inlineStyle="padding:2px;">
                        <af:image source="#{resource['images:road_to_mount_cook-wallpaper-1280x800.jpg']}"
                                  shortDesc="Road To Mount Cook" id="i4" inlineStyle="width:250px;height:200px; "/>
                        <af:button text="View" id="b4"/>
                    </af:panelGroupLayout>
                    <af:panelGroupLayout id="pgl6" layout="vertical" halign="center" inlineStyle="padding:2px;">
                        <af:image source="#{resource['images:skyscrapers_reflections-wallpaper-1280x800.jpg']}"
                                  shortDesc="Skycrappers " id="i5" inlineStyle="width:250px;height:200px; "/>
                        <af:button text="View" id="b5"/>
                    </af:panelGroupLayout>
                    <af:panelGroupLayout id="pgl7" layout="vertical" halign="center" inlineStyle="padding:2px;">
                        <af:image source="#{resource['images:tufandisli_1387241118_57.jpg']}" shortDesc="Tufan"
                                  id="i6" inlineStyle="width:250px;height:200px; "/>
                        <af:button text="View" id="b6"/>
                    </af:panelGroupLayout>
                </af:panelGroupLayout>

 and how it looks on page-


You can see here last image is not appearing properly because total width of all images has crossed maximum available width of browser window
Now i want to show last image on next line
So to do this set parent panel group layout to default layout and set display:inline-block for all child panel group layout


<af:panelGroupLayout id="pgl1">
                    <af:panelGroupLayout id="pgl2" layout="vertical" halign="center"
                                         inlineStyle="padding:2px;display:inline-block;">
                        <af:image source="#{resource['images:a_hobbit_house-wallpaper-1280x800.jpg']}"
                                  shortDesc="Hobbit House" id="i1" inlineStyle="width:250px;height:200px; "/>
                        <af:button text="View" id="b1"/>
                    </af:panelGroupLayout>
                    <af:panelGroupLayout id="pgl3" layout="vertical" halign="center"
                                         inlineStyle="padding:2px;display:inline-block;">
                        <af:image source="#{resource['images:beach_at_sunset_3-wallpaper-1440x900.jpg']}"
                                  shortDesc="Sunset at Beach" id="i2" inlineStyle="width:250px;height:200px; "/>
                        <af:button text="View" id="b2"/>
                    </af:panelGroupLayout>
                    <af:panelGroupLayout id="pgl4" layout="vertical" halign="center"
                                         inlineStyle="padding:2px;display:inline-block;">
                        <af:image source="#{resource['images:icelands_ring_road-wide.jpg']}" shortDesc="Ring Road"
                                  id="i3" inlineStyle="width:250px;height:200px; "/>
                        <af:button text="View" id="b3"/>
                    </af:panelGroupLayout>
                    <af:panelGroupLayout id="pgl5" layout="vertical" halign="center"
                                         inlineStyle="padding:2px;display:inline-block;">
                        <af:image source="#{resource['images:road_to_mount_cook-wallpaper-1280x800.jpg']}"
                                  shortDesc="Road To Mount Cook" id="i4" inlineStyle="width:250px;height:200px; "/>
                        <af:button text="View" id="b4"/>
                    </af:panelGroupLayout>
                    <af:panelGroupLayout id="pgl6" layout="vertical" halign="center"
                                         inlineStyle="padding:2px;display:inline-block;">
                        <af:image source="#{resource['images:skyscrapers_reflections-wallpaper-1280x800.jpg']}"
                                  shortDesc="Skycrappers " id="i5" inlineStyle="width:250px;height:200px; "/>
                        <af:button text="View" id="b5"/>
                    </af:panelGroupLayout>
                    <af:panelGroupLayout id="pgl7" layout="vertical" halign="center"
                                         inlineStyle="padding:2px;display:inline-block;">
                        <af:image source="#{resource['images:tufandisli_1387241118_57.jpg']}" shortDesc="Tufan"
                                  id="i6" inlineStyle="width:250px;height:200px; "/>
                        <af:button text="View" id="b6"/>
                    </af:panelGroupLayout>
                </af:panelGroupLayout>

Now it appears like this -

now again test it by increasing and decreasing browser window width , images and group layout are adjusted as per screen size automatically like a grid view (row and columns)

Thanks , Happy Learning :)
Sample ADF Application- Download

Monday, 9 February 2015

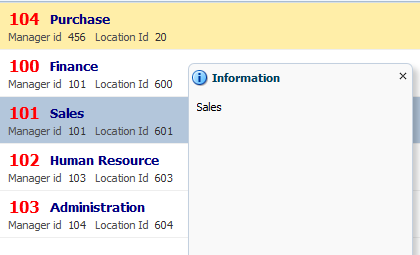
Custom selection listener for af:listView, Invoke selectionListener programmatically

In the last post (Better UI for data collection using af:listView, Enable selection in ADF Faces List component ) about af:listView, we saw that how can we present data collection in a better way using af:listView and enable selection using EL (same as used for af:table)

Now in this post i will describe about defining custom selection listener for af:listView
Suppose you have to do some task on selection of an item in list other than making it current row, for this you have to override default selection listener and define own custom selection listener in managed bean
So next step is to define a method in managed bean for handling selection event of af:list view


  • Select af:listView, goto properties and click on edit menu of selectionListener property and create a method in managed bean


  • now see what we have to do in custom selection listener, first invoke default selection listener EL (#{bindings.Departments1.collectionModel.makeCurrent}) to make selected row as current and then get current row from iterator as selected row is now current row
    See the managed bean code -

  • //Import these packages
    
    import javax.el.ELContext;
    import javax.el.ExpressionFactory;
    import javax.el.MethodExpression;
    import javax.el.ValueExpression;
    
    import javax.faces.application.FacesMessage;
    import javax.faces.context.FacesContext;
    
    import oracle.jbo.Row;
    
    import org.apache.myfaces.trinidad.event.SelectionEvent;   
    
    
     /**
         * Programmatic invocation of a method that an EL evaluates to.
         *
         * @param el EL of the method to invoke
         * @param paramTypes Array of Class defining the types of the parameters
         * @param params Array of Object defining the values of the parametrs
         * @return Object that the method returns
         */
        public static Object invokeEL(String el, Class[] paramTypes, Object[] params) {
            FacesContext facesContext = FacesContext.getCurrentInstance();
            ELContext elContext = facesContext.getELContext();
            ExpressionFactory expressionFactory = facesContext.getApplication().getExpressionFactory();
            MethodExpression exp = expressionFactory.createMethodExpression(elContext, el, Object.class, paramTypes);
    
            return exp.invoke(elContext, params);
        }
    
        /**
         * Programmatic evaluation of EL.
         *
         * @param el EL to evaluate
         * @return Result of the evaluation
         */
        public static Object evaluateEL(String el) {
            FacesContext facesContext = FacesContext.getCurrentInstance();
            ELContext elContext = facesContext.getELContext();
            ExpressionFactory expressionFactory = facesContext.getApplication().getExpressionFactory();
            ValueExpression exp = expressionFactory.createValueExpression(elContext, el, Object.class);
    
            return exp.getValue(elContext);
        }
    
        /**Custome Selection Listener for af:listView
         * @param selectionEvent
         */
        public void listSelectionListener(SelectionEvent selectionEvent) {
            //invoke this EL to set selected row as current row, if it is not invoked then first row will be current row
            invokeEL("#{bindings.Departments1.collectionModel.makeCurrent}", new Class[] { SelectionEvent.class }, new Object[] {
                     selectionEvent });
            // get the selected row , by this you can get any attribute of that row
            Row selectedRow = (Row) evaluateEL("#{bindings.Departments1Iterator.currentRow}");
            FacesMessage msg = new FacesMessage(selectedRow.getAttribute("DepartmentName").toString());
            msg.setSeverity(FacesMessage.SEVERITY_INFO);
            FacesContext.getCurrentInstance().addMessage(null, msg);
        }
    

  • Now run application and check

Download Sample ADF Application here
Thanks , Happy Learning :)

Friday, 6 February 2015

Better UI for data collection using af:listView, Enable selection in ADF Faces List component

af:listView is a new component introduced in Jdev 12C to show tabular data (rows of a collection), it uses same configuration as af:table
In this post i will be describing- how to create af:listView using ADF business component and  how we can enable selection in af:listView

Let's start
How to create af:listView using ADF BC-
  • Created a Fusion Web Application and prepared model using Departments table of HR Schema


  • drop Departments viewObject on page from DataControl as ADF List View


    Configuration Wizard for List is opened, set the appropriate layout


    Set the value binding that we want to show on page


    After this we can customize layout on page also, we can change color, style width etc;
    see XML source of af:listView-

    <af:listView value="#{bindings.Departments1.collectionModel}" var="item"
                                 emptyText="#{bindings.Departments1.viewable ? 'No data to display.' : 'Access Denied.'}"
                                 fetchSize="#{bindings.Departments1.rangeSize}" id="lv1">
                        <af:listItem id="li1">
                            <af:panelGroupLayout layout="horizontal" id="pgl1">
                                <f:facet name="separator">
                                    <af:spacer width="10" id="s1"/>
                                </f:facet>
                                <af:outputFormatted value="#{item.bindings.DepartmentId.inputValue}" id="of1"
                                                    inlineStyle="font-weight:bold;font-size:medium;color:red;">
                                    <af:convertNumber groupingUsed="false"
                                                      pattern="#{bindings.Departments1.hints.DepartmentId.format}"/>
                                </af:outputFormatted>
                                <af:outputFormatted value="#{item.bindings.DepartmentName.inputValue}" id="of2"
                                                    inlineStyle="font-weight:bold;font-size:small;color:navy;"/>
                            </af:panelGroupLayout>
                            <af:panelGroupLayout id="pgl2">
                                <af:outputLabel value="Manager id" id="ol1"/>
                                <af:outputFormatted value="#{item.bindings.ManagerId.inputValue}" id="of3">
                                    <af:convertNumber groupingUsed="false"
                                                      pattern="#{bindings.Departments1.hints.ManagerId.format}"/>
                                </af:outputFormatted>
                                <af:spacer width="10" height="10" id="s2"/>
                                <af:outputLabel value="Location Id" id="ol2"/>
                                <af:outputFormatted value="#{item.bindings.LocationId.inputValue}" id="of4">
                                    <af:convertNumber groupingUsed="false"
                                                      pattern="#{bindings.Departments1.hints.LocationId.format}"/>
                                </af:outputFormatted>
                            </af:panelGroupLayout>
                        </af:listItem>
                    </af:listView>


    and how it looks on page- hmmm better than af:table


  • By default adf listView doesn't support selection, you can see Selection property is set to none. it shares same configuration as af:table , you can see that value property is bound to #{bindings.Departments1.collectionModel} and attributes are populated using variable reference of this collection


  • To enable selection just set Selection to single and in selectionListener property of list set #{bindings.Departments1.treeModel.makeCurrent}


  • Now Run this application and check, single selection is enabled
 Thanks, happy learning :)

Monday, 8 December 2014

Show animated Image Caption using jQuery in ADF Faces

This is another post about using jQuery in ADF Faces, see previous posts on jQuery

Using JQuery in Oracle ADF 
Image zoom (power zoomer) effect using Jquery in ADF Faces

This post talks about - how to add mouse hover caption to images? Caption means a brief explanation of picture/image. Normally 'alt' attribute of HTML page is used as Image Caption
But in ADF Faces af:image doesn't has 'alt' property , there is a property called 'shortdesc' and this property is used as 'alt' attribute for image when jsf page is loaded at client browser
you can check this in html source of your page in browser (inspect element)


<af:image shortDesc="Black Horse running or flying" id="FirstImage"
                                  inlineStyle="height:300px;width:500px;"
                                  source="#{resource['images:Best-Wild-Animal-Photos-of-2012-307-black-horse-running.jpg']}"/>


JSF page is converted to html for client side presentation, see in HTML source 'shortdesc' is used as 'alt' property


jQuery is used for client side scripting of HTML so jQuery script makes use of this 'alt' attribute to show animated caption for image
There are lots of jQuery and JavaScript available for showing different types of captions , here i am using jQuery Capty - A Caption Plugin (Download jQuery script and respective css file from link)

Now follow steps to use this jQuery plugin with ADF Faces
  • Create Fusion Web Application and a page in viewController, added jQuery script and css in viewController project (Jdev 12.1.3)


  • Add jQuery library and script file reference to page, also add css file reference to page

  •  //jQuery library reference
                <af:resource type="javascript" source="https://ajax.googleapis.com/ajax/libs/jquery/1.7.2/jquery.min.js"></af:resource>
                //jQuery file reference that will be used to show caption
                <af:resource type="javascript" source="js/jquery.capty.js"/>
                <af:resource type="javascript" source="js/jquery.capty.min.js"/>
                //CSS file to style Caption
                <af:resource type="css" source="css/jquery.capty.css"/>
    

  • Next step is to execute jQuery function on pageload to show caption

  • //Function to show default sliding caption
    
    $('#ImageId').capty();
    
    //Change default fucntion to change animation type , speed and height of caption
    
    $('#ImageId').capty({
    animation: 'fade',
    speed:     1000
    }) 
    

  • So here i am using both function for two different images (for first image animation type is slide (default) and for second it is fade), add clientListener to document tag and set it's type to 'load' (to execute jQuery function on pageload)

  •  <af:clientListener method="jQuery(document).ready(function($){ $('#FirstImage').capty(); $('#SecondImage').capty({animation: 'fade',   speed:     1000}) })" type="load"/>
    

  • Run application and see magic of jQuery

  • Image Caption (animation:slide)-

    Image Caption (animation:fade)-

  • you can change style (color,font etc) of caption box by modifying css sheet and size can be increased or decreased from jQuery function. for example i have changed color, font and size of caption box. see this

  • @CHARSET "UTF-8";
    
    div.capty-caption {
     background-color: red;
     color: #FFF;
     font: bold 11px cursive;
     padding-left: 10px;
     padding-top: 7px;
     text-shadow: 1px 1px 0 #222;
    }
    
    div.capty-caption a {
     color: #318DAD;
     font: bold 11px verdana;
     text-decoration: none;
     text-shadow: none;
    }
    

    jQuery function to increase size-

    jQuery(document).ready(function($){ $('#FirstImage').capty(); $('#SecondImage').capty({animation: 'fade',   speed:1000,height:50}) })
    

    See output-
Thanks, Happy Learning :)
Download Sample ADF Application